Digital Forensics Fundamentals
Learn the basics of digital forensics, including how evidence is collected, preserved, and analyzed. Explore real-world forensic processes through a practical TryHackMe scenario.
Forensics is the application of methods and procedures to investigate and solve crimes. The branch of forensics that investigates cyber crimes is known as digital forensics. Cyber crime is any criminal activity conducted on or using a digital device. Several tools and techniques are used to investigate digital devices thoroughly after any crime to find and analyze evidence for necessary legal action.
The digital forensics team has various cases requiring different tools and techniques. However, the National Institute of Standards and Technology (NIST) defines a general process for every case. The NIST works on defining frameworks for different areas of technology, including cyber security, where they introduce the process of digital forensics in four phases.
Collection
The first phase of digital forensics is data collection. Identifying all the devices from which the data can be collected is essential. Usually, an investigator can find personal computers, laptops, digital cameras, USBs, etc., on the crime scene. It is also necessary to ensure the original data is not tampered with while collecting the evidence and to maintain a proper document containing the collected items’ details. Evidence-acquisition procedures will be discussed in the upcoming tasks.Examination
The collected data may overwhelm investigators due to its size. This data usually needs to be filtered, and the data of interest needs to be extracted.
For example, if an investigator collects all the media files from a digital camera on the crime scene, they may only require media from a specific date and time. In the examination phase, these specific media files would be filtered and moved to the next phase.
Similarly, if a system contains multiple user accounts, only one user’s data might be relevant. The examination phase helps isolate this particular data for analysis.Analysis
This is a critical phase. Investigators now analyze the data by correlating it with multiple pieces of evidence to draw conclusions. The analysis depends on the case scenario and the available data. The goal is to extract the activities relevant to the case and arrange them in chronological order.Reporting
In the final phase of digital forensics, a detailed report is prepared. This report includes the investigation’s methodology and findings from the collected evidence. It may also contain recommendations.
The report is presented to law enforcement and executive management, and it is important to include an executive summary that is understandable by all receiving parties.
As part of the collection phase, we saw that various pieces of evidence can be found at the crime scene. Analyzing these multiple categories of evidence requires various tools and techniques. There are different types of digital forensics, all with their own collection and analysis methodologies. Some of the most common types are listed below.
Computer Forensics:
The most common type of digital forensics, computer forensics involves investigating computers — the devices most commonly used in crimes.Mobile Forensics:
Mobile forensics involves investigating mobile devices and extracting evidence such as call records, text messages, GPS locations, and more.Network Forensics:
This area of forensics covers investigations beyond individual devices and focuses on the entire network. Most evidence found in networks consists of network traffic logs.Database Forensics:
Many critical pieces of data are stored in dedicated databases. Database forensics investigates any intrusion into these databases that results in data modification or exfiltration.Cloud Forensics:
Cloud forensics involves investigating data stored on cloud infrastructure. This type of investigation can be tricky due to limited access and evidence in cloud environments.Email Forensics:
Email forensics examines emails, which are a common communication method in professional environments. Investigations determine whether emails were part of phishing or fraudulent campaigns.
Acquiring evidence is a critical job. The forensics team must collect all the evidence securely without tampering with the original data. Evidence acquisition methods for digital devices depend on the type of digital device. However, some general practices must be followed while the evidence is acquired. Let’s discuss some of the important ones.
Proper Authorization
The forensics team should obtain authorization from the relevant authorities before collecting any data. Evidence collected without prior approval may be deemed inadmissible in court. Forensic evidence contains private and sensitive data of an organization or individual. Proper authorization before collecting this data is essential for investigating according to the limits of the law.
Chain of Custody
Imagine that a team of investigators collects all the evidence from the crime scene, and some of the evidence goes missing after a few days, or there is any change in the evidence. No individual can be held accountable in this scenario because there is no proper process for documenting the evidence owners. This problem can be solved by maintaining a chain of custody document. A chain of custody is a formal document containing all the details of the evidence. Some of the key details are listed below:
- Description of the evidence (name, type).
- Name of individuals who collected the evidence.
- Date and time of evidence collection.
- Storage location of each piece of evidence.
- Access times and the individual record who accessed the evidence.
- This creates a proper trail of evidence and helps preserve it. The chain of custody document can be used to prove the integrity and reliability of the evidence admitted in court. A sample chain of custody can be downloaded from here.
Use of Write Blockers
Write blockers are an essential part of the digital forensics team’s toolbox. Suppose you are collecting evidence from a suspect’s hard drive and attaching the hard drive to the forensic workstation. While the collection occurs, some background tasks in the forensic workstation may alter the timestamps of the files on the hard drive. This can cause hindrances during the analysis, ultimately producing incorrect results. Suppose the data was collected from the hard drive using a write blocker instead in the same scenario. This time, the suspect’s hard drive would remain in its original state as the write blocker can block any evidence alteration actions.
Windows Forensics
The most common types of evidence collected from crime scenes are desktop computers and laptops, as most criminal activity involves a personal system. These devices have different operating systems running on them. In this task, we will discuss the evidence acquisition and analysis of the Windows operating system, which is a very common operating system that has been investigated in several cases.
As part of the data collection phase, forensic images of the Windows operating system are taken. These forensic images are bit-by-bit copies of the whole operating system. Two different categories of forensic images are taken from a Windows operating system.
- Disk Image:
The disk image contains all the data present on the storage device of the system (HDD, SSD, etc.). This data is non-volatile, meaning it persists even after a restart or shutdown of the system.
Examples of data stored in a disk image include:- Media files
- Documents
- Internet browsing history
- Installed programs and configurations
- Memory Image:
The memory image captures the data inside the system’s RAM (Random Access Memory). This memory is volatile, meaning the data is lost once the system is powered off or restarted.
Capturing a memory image should be a priority in forensic investigations to avoid losing:- Open files
- Running processes
- Current network connections
- Loaded malware in memory
Disk and memory images are both critical in Windows OS forensics and should be collected carefully to preserve the integrity of the evidence.
Let’s discuss some popular tools used for disk and memory image acquisition and analysis of the Windows operating system.
FTK Imager: FTK Imager is a widely used tool for taking disk images of Windows operating systems. It offers a user-friendly graphical interface for creating the image in various formats. This tool can also analyze the contents of a disk image. It can be used for both acquisition and analysis purposes.
Autopsy: Autopsy is a popular open-source digital forensics platform. An investigator can import an acquired disk image into this tool, and the tool will conduct an extensive analysis of the image. It offers various features during image analysis, including keyword search, deleted file recovery, file metadata, extension mismatch detection, and many more.
DumpIt: DumpIt offers the utility of taking a memory image from a Windows operating system. This tool creates memory images using a command-line interface and a few commands. The memory image can also be taken in different formats.
Volatility: Volatility is a powerful open-source tool for analyzing memory images. It offers some extremely useful plugins. Each artifact can be analyzed using a specific plugin. This tool supports various operating systems, including Windows, Linux, macOS, and Android.
Challenge
Once started, open a new terminal and navigate to the /root/Rooms/introdigitalforensics directory as shown below. In the following terminal output, we changed to the directory containing the case files.
1
root@tryhackme:~# cd /root/Rooms/introdigitalforensics
When you create a text file, TXT, some metadata gets saved by the operating system, such as file creation date and last modification date. However, much information gets kept within the file’s metadata when you use a more advanced editor, such as MS Word. There are various ways to read the file metadata; you might open them within their official viewer/editor or use a suitable forensic tool. Note that exporting the file to other formats, such as PDF, would maintain most of the metadata of the original document, depending on the PDF writer used.
Let’s see what we can learn from the PDF file. We can try to read the metadata using the program pdfinfo. Pdfinfo displays various metadata related to a PDF file, such as title, subject, author, creator, and creation date. (The AttackBox already has pdfinfo installed; however, if you are using Kali Linux and don’t have pdfinfo installed, you can install it using sudo apt install poppler-utils.) Consider the following example of using pdfinfo DOCUMENT.pdf:
1
2
3
4
5
6
7
8
9
10
11
12
13
14
15
16
17
root@tryhackme:~# pdfinfo DOCUMENT.pdf
Creator:        Microsoft® Word for Office 365
Producer:       Microsoft® Word for Office 365
CreationDate:   Wed Oct 10 21:47:53 2018 EEST
ModDate:        Wed Oct 10 21:47:53 2018 EEST
Tagged:         yes
UserProperties: no
Suspects:       no
Form:           none
JavaScript:     no
Pages:          20
Encrypted:      no
Page size:      595.32 x 841.92 pts (A4)
Page rot:       0
File size:      560362 bytes
Optimized:      no
PDF version:    1.7
The PDF metadata clearly shows that it was created using MS Word for Office 365 on October 10, 2018.
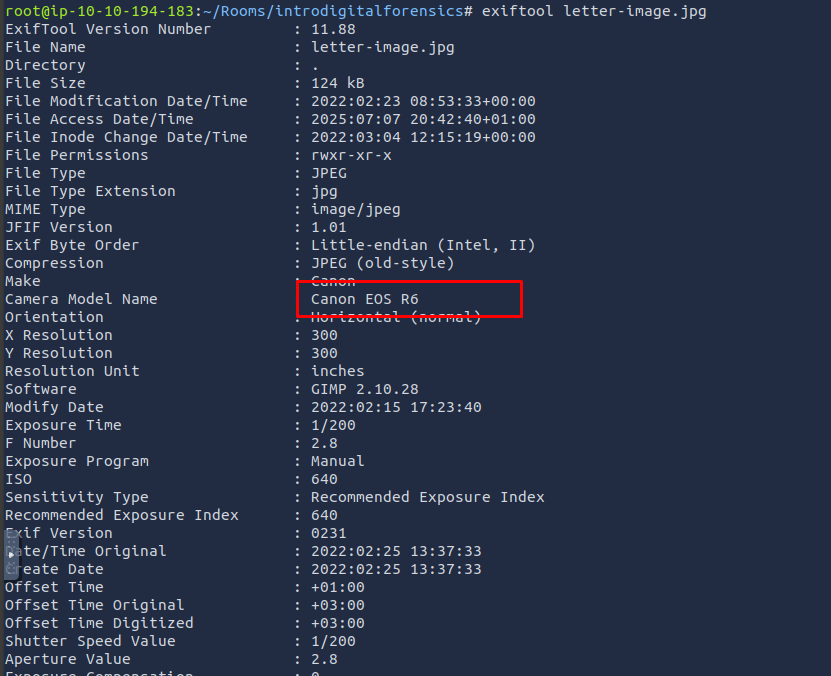
Photo EXIF Data
EXIF stands for Exchangeable Image File Format; it is a standard for saving metadata to image files. Whenever you take a photo with your smartphone or with your digital camera, plenty of information gets embedded in the image. The following are examples of metadata that can be found in the original digital images:
Camera model / Smartphone model Date and time of image capture Photo settings such as focal length, aperture, shutter speed, and ISO settings Because smartphones are equipped with a GPS sensor, finding GPS coordinates embedded in the image is highly probable. The GPS coordinates, i.e., latitude and longitude, would generally show the place where the photo was taken.
There are many online and offline tools to read the EXIF data from images. One command-line tool is exiftool. ExifTool is used to read and write metadata in various file types, such as JPEG images. The AttackBox already has exiftool installed; however, if you are using Kali Linux and don’t have exiftool installed, you can install it using sudo apt install libimage-exiftool-perl. In the following terminal window, we executed exiftool IMAGE.jpg to read all the EXIF data embedded in this image.
1
2
3
4
root@tryhackme:~# exiftool IMAGE.jpg
[...]
GPS Position : 51 deg 31' 4.00" N, 0 deg 5' 48.30" W
[...]
If you take the above coordinates and search one of the online maps, you will learn more about this location. Searching Microsoft Bing Maps or Google Maps for 51 deg 30’ 51.90” N, 0 deg 5’ 38.73” W reveals the street where the photo was taken. Note that for the search to work, we had to replace deg with ° and remove the extra white space. In other words, we typed 51°30’51.9”N 0°05’38.7”W in the map search bar.
Using pdfinfo, find out the author of the attached PDF file, ransom-letter.pdf.

Using exiftool or any similar tool, try to find where the kidnappers took the image they attached to their document. What is the name of the street?

What is the model name of the camera used to take this photo?